Pages

Showing posts with label Memory Lane. Show all posts

Thursday, March 27, 2014

Birthday Shoes (Tutorial)

Hey luvs,


Below is the how to instructions I used to bling out Baby O’s converses for her Winter ONEderland Affair I told you about here.  Working on this labor of love was pretty straight forward and easy however, I found that having the right tools is imperative. Additionally, don’t try this one unless you have patience lol. In all seriousness the end results of this one makes completing the task worth it, so if you have a little free time I hope you give it a try...Enjoy!

Supplies
  • Converse Sneakers
  • Hot Glue Gun and Glue Sticks
  • 2 Bows
  • Swarovski Elements Hotfix Crystals (the amount depends and size of crystals will vary based on how much bling you want and the size of the shoe)
  • Swarovski Elements Hotfix Crystals Tool ($20 at Michael’s)
  • Ribbon
Step by Step Instructions
  1. Open your Hotfix Crystals Tool.
  2. Plug Hotfix Crystals Tool in the wall.
  3. Select the proper size tip (to match your crystal size) and place it on the Hotfix Crystals Tool.
  4. Open your Hotfix Crystals
  5. Lay your crystals flat on the table
  6. Take the Hotfix Crystals Tool and place it over one of the crystals
  7. Pick the Hotfix Crystals Tool up and the crystal should be on it
  8. Place the Hotfix Crystals Tool on the shoe
  9. Hold the Hotfix Crystals Tool on the shoe for a few second
  10. Remove the Hotfix Crystals Tool from the shoe and the crystal should be on the shoe
  11. Repeat the above steps until you shoe is bling out the way you want it
Once the shoe is has the right amount of bling...Add the bow
  1. Plug up your Glue gun
  2. Add a glue stick
  3. Grab one of your bows and add a little glue on it
  4. Place the bow on the back of your shoe
  5. Hold the bow on the shoe for a minute
  6. Repeat the above steps for the second shoe
  7. Let your shoes try for 48 hours

The Tool

My Process
My Final Product

                                          Happy crafting fellow heartbeats

Tuesday, March 25, 2014

Memory Lane: Winter ONEderland (Outfit)

Of all the post in this series this is by far the one I’m most excited to share. Not only do I love talking about my little diva fashions, but for the most part all her outfits turned out just as I expected. Yes I said all her outfitsJ.  Turned out she needed an outfit for the cake smash session, party, and her actual birthday. As I told you in my previous post we had a lot going on in one weekend, and of course being that she’s only a toddler I wanted to have several outfits in case things got messy with one or two of them along the way.  I didn’t want to waste my time fighting stains during a hectic weekend. When I’d much rather take that pressure off in that area and simply allow her to be free to enjoy herself, so momma had options on deck.
Cake Smash
Once I knew the theme for of the party I immediately emailed Baby O’s photographer Alana Marie Imagery (she is a beast, like serious I’m never disappointed with her work.) to book the cake smash session. I had already dropped the hint that I wanted to do one over the summer at our family 6 month photo shoot, but I needed to email her so she’d know I was serious, reserve our date, and start brainstorming on how the set would look. Emailing Alana got me super excited and directly after, I stayed up really late one sleepless night scouring one of my favorite sites for handmade items...Etsy.  When I first started my Etsy search I wasn’t quite sure what type of look I was going for, but very soon into it I found the perfect look via a site called lilabbehandmade. This site had the cutest little tutu sets I’d ever seen and trust having a daughter I had seen a ton lol. But, these were different and could be customized so no two were the sameJ. Talk about exclusive, It was perfect. After looking through all the designs the shop offered, and reading through some of their reviews, I immediately messaged them with a laundry list of questions.  Much to my surprise the owner Wendy responded promptly and we spent the rest of that night ironing out the details.  I felt so comfortable with her work and responses I wanted to see Baby O’s outfit right then and there lol. Unfortunately, that couldn’t happen as this shop was very high and demand and me placing my order in November only meant that I was guaranteed to receive it just a few days before the big photo shoot. Naturally the wait time had me nervous but I checked my nerves at the door because as I stated above...momma had options. When I received this outfit the week of Baby O’s photo session it was totally worth every dime I spent and all the anxiety had. Wendy had out done herself and I honestly couldn’t believe that she created such a masterpiece from just these few details...
Colors
Design 
 Final product photos
Party Outfit
Sometime after I had placed my order with Wendy for the cake smash look my friend Mariah launched her new online boutique Mariah’s Closet. Among the looks her designed was the most adorable little skater skirt she created for another toddler. I fell in love and just knew Baby O had to have it, so I texted her instantly to work out the details. We decided that an all-white leather skirt with purple accents on the bow was the way to go and I couldn’t have been happier with the decision.
However, I was a bit concerned when it came to the shirt selection.  Not only did I not know exactly what shirt I’d get to compliment the skirt, but I also had to ensure I selected the perfect white. I couldn’t have my little diva in all white attire that didn’t match, but not having seen the material before and how was I supposed to if my white would work.  In any case I knew I wanted to go with an oneies in order to prevent any wardrobe malfunctions and found the PERFECT one at H&M.  Well almost perfect. It was everything I was looking for but the bow tie color was off...grrrr. 

Being the innovative momma I am decide to switch it up and find some purple bows and buttons to replace the existing ones.  As always my dear friend Tabby helped me out by gifting me some left over bows she had made for her daughter. I excitedly took them, my new purple buttons, and the shirt to the cleaners and requested a shirt up grade lol. The final product was everything I’d hope it would be :)
With most of her party look complete the only thing left for me to worry about was her shoes. I’m a firm believer that the shoes you wear makes your outfit so I had to make sure hers were awesome. Unfortunately, for me she has some tiny little feet so most cute little girl shoes don’t come in her size, and I was left with only one option...tennis shoes. How in the world I was going to make this preppy look work with a pair of tennis shoes was a mystery until a friend randomly tagged me in a Instagram boutique that customize chuck Taylors.  The designs were awesome so I thought it was the perfect route to go until I seen their prices. There was just no way I was going to pay over $150 for a pair of kid shoes. So I decided to make defining her shoes another labor of love for the party and DIY them (tutorial coming soon). After a few failed test runs I figured out the perfect formula and got it right.
Inspiration
Test

Final
With Baby O’s cake smash outfit and her planned attire for the party complete she was all set. Although, due to the material of her custom skater skirt it was a bit heavier than expected. So to ensure she had the best time playing at her party she had a little outfit change half way through her Winter ONEderlamd affair. Which, all her guest seemed to love and made my heart smile because she got some good use out of all her looks. 
First Look
Second Look

Wednesday, March 19, 2014

Memory Lane: Winter ONEderland (Decor)

Hey Luvs!
As I mentioned in my previous post Tabby, Zion, Baby O, and I left the venue not only loving it but chatting it up about how to decorate the space. Of course being the planner that I am, I already spotted various elements I wanted to have at the party. My muse became a great source of inspiration by the way she transformed her lovely home into an amazingly elegant winter onderland affair but, I wanted to make Baby O's party a little more fun. Keeping the focus on the kiddies I had planned an all-white affair with pops of color like...fuchsia, turquoise, and purple.  I had seen a winter onederland themed party in these colors and although it didn't translate as well as my muse the color combo was simply beautiful.
Color inspiration
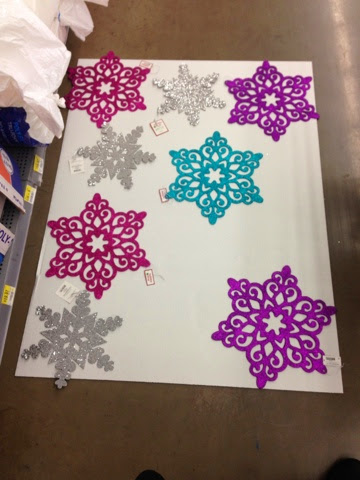
One day while out shopping at Wal-Mart I decided to venture over to the Christmas section for snowflake inspiration. OMG!!! They had so many I loved in all the right colors. How in the world was I going to contain myself? Thankfully I had a budget that I wanted/needed to stay under and decorating restrictions from my venue. This ultimately left me with the decision to choose the elements that provided with the best bang for my buck. While at the venue the night I booked it, Tabby and I had taken measurements of the classroom boards so I'd know exactly how much space there was to cover and the amount of supplies we needed.  I carefully selected each item based on its place in the room. Using the photos of the venue Tabby and I took with our phones...I was able to see the dream and plan for proper execution. Although, I didn't buy anything that day I did leave Wal-Mart with a few key photos. Yet, had a plan in place to do a little more research and confirm with the Hubs that the funds were available.
Here are some of the items I considered
Over the next few days I did a ton of research on the cost of the products I had seen. When I look back on it I spent a lot of time focusing on the decor but it was worth it. After determining Wal-Mart was the best place to purchase most of my décor. I went back to the store, politely sat on their floor in the Christmas aisle, and designed a mock up. Once I could see my vision coming to fruition I decided to purchase with the intent to return. I see the side eyes, so let me go ahead and explain the purchase with the intent to return comment. Since these items were seasonal I knew the day after Christmas they'd go on sale, and being the bargain shopper I am, my plan was to buy now and take them back later. That way I’d have what I wanted and also get the 50% off. Oh honey believe I didn't when I did (I don't care if I'm the richest person in the world. I won't ever be above a good deal lol), I actually wish I could have waited until after Christmas to purchase my items but they were a hot commodity. In any case I could check those Wal-Mart purchases off my list and spend the rest of my time focusing on the small but significant details that would make up the spaces below...
My in store mock up

The Entry Way/Photo Op
Looking back through the photos of the venue I realized that the entry way would be the first thing Baby O’s guest seen when they entered the reception area.  I then noticed that it had sort of a dramatic flare to it since everyone had to turn the corner to actually get in the room where the food and everything was. Oh! I had to play this up, I found a picture and tutorial on pinterest of some beautiful paper snowflakes that I knew would work perfect in this area.  Once I described them to my planning partner in crime Tabby she explained that she had done them before for a work shindig and agreed to take on the task of putting them to together for the party.   She is beyond a crafty mama so I not only trusted that she’d get them done, but I also knew she’d ensure they were perfect.  I picked up a ream of colorful paper from staples and handed it over to her without a care in the world :).
Entry

My inspirtaion
Progress photo from Tabby
Entry way anchor (I got these beautiful sparkaly trees from Home Goods and plan to use them in my Christmas decor this year)
Kiddie Table
Keeping the focus of this party on Baby O and her tiny tot friends I wanted to ensure that they not only had a play area that catered to them but, an area to enjoy their food at in which they felt comfortable.  I always get a kick of walking up to Baby O’s classroom at snack time, and seeing her and the other kiddies sitting at their little table munching on their snacks. It’s seriously one the cutest thing I’ve ever seen and I’m sure they totally feel all grown up lol. So I decided to create a similar set up at her party using a few portable tables (the table I used has adjustable height and I just set it at the lowest) that we have at the house and I rented chairs from local vendor. Of course, the event planner in me says no table is complete without the proper tablescape, so linen (borrowed from Tabby stash) and centerpieces were definitely in order. While out shopping for the day after Christmas I found the perfect snowman centerpieces for the table. I was already stalking my local target for these adorable snowman sippy cups I had seen to go on sale. But when they did I almost had a heart attack, because I made it to my target to late, I called Tabby and alerted her about this state of emergency as I rushed over to the other target by my home only to find they were out of stock too. I drove back home feeling defeated that the cups I had envisioned holding the kiddies drinks this entire time was sold out. Only for my boo Tabby to call saying her target had them and she picked up every last one they had...YES. With that out the way the kiddie table was almost complete, and the only thing left to do was stop by party city and grab their tiny plates.

Wrapping paper
Snowman
Layout on Table
The infamous sippy cups
My redesign and added personalization
Centerpieces
Looking at my muse photos I fell in love with the manzanite branch centerpieces she put together.  But, I also knew they cost more than I wanted to pay for centerpieces (based on my previous wedding planning experience and the vendor list she posted). So I was in the market for alternatives that we not only just as beautiful but also made a statement. Tabby had some a couple 20in vases leftover vases from our wedding planning days that she was more than happy to let me borrow (I secretly think she wanted them out of her beautiful new home), so she built the centerpieces based on using those jars. While, out and about at Michael’s she noticed they had some of their beautiful branches on sale and suggested I go check them out to see if I could use then for the party. Needless to say I headed there the same day and some metallic silver and oh so glittery ones. I handed them over to Tabby sho had found the perfect purple vase filler while thrifting and she created a masterpiece. Unfortunately, the supplies we had only yielded one centerpiece so I needed to find something else for the other two adult tables. Well during my after Christmas shopping spree I found two amazing white wire Christmas trees at pier one that, complimented the branch piece perfectly. Along the way Tabby picked up a few other items that she knew would complete the vision but for the most part the tables were done. 
Top view of centerpiece

Bottom of branch centerpiece
Full view (these progress photos doesn't do this justice)
Pier One wire trees
Amongst, these areas there were other signature pieces that brought the party to life such as; the overall wall décor, an awesome back drop for the kids table, great food, desert table, mini glitter top hats, a hot chocolate bar, and a candy apple filled favor table (all to be discussed in my future post).  
Wall decor
Snowflake menu cards
Table accents
Favors
Candy apples
Signage
Overall nothing was missed and the all-white winter onederland was executed flawlessly. I just knew that with some many décor elements purchased I had to ensure that the month of January was spent pulling everything together. I set out with a goal for myself to complete one project each night; however it was imperative that all my crafting was completed before the first guest arrived at my home. As, I could almost guarantee that Baby O’s birthday weekend was going to be busy, my house was going to be filled with house guest (which I wanted to enjoy), plus she had her cake smash session, and the party. 

Monday, March 17, 2014

Memory Lane: Winter ONEderland (Venue)

To begin, I thought I’d start with Olivia’s Winter ONEderland (first birthday party) fun.  By way of background, I'll be completely honest.  I was totally one of those parents that yelled and screamed from the rooftops that I didn’t believe in first birthday parties (hangs head in shame and shrug shoulders). I would jokingly refer to first birthday parties as... the parent’s party - lol. At the time, I truly didn’t believe in them until about 8 or 9 months after I had Olivia Madison. Right around that time... I decided to reconsider this whole first birthday thing and that I wanted one for my babyJ.

I mean, why not? She was growing like a weed, hitting every milestone I’d read about, and she LOVED birthday parties.  We had been to a few of my coworkers' children's parties and she had a BALL. Denying her of her own was no longer an option and, with the amount of family and friends that wanted to celebrate with her, a big affair was in order. I found my inspiration for a Winter ONEderland here (Rustic Winter Wonderlandand shared the new plans with my boo, Tabby of (Shipwrecked On Fabulous Island).

Now Let’s digress for a moment and put things into perspective. Olivia Madison was born on Tabby’s birthday and if you head to her blog you’ll find she is all about a celebration. Naturally, Tabby was bummed by my initial 'No Parents Party' protest and had been trying to convince me of otherwise. When I changed my mind, I knew she would be all in and she was!  After all, they are exactly 30 years apart.  To Tabby, this meant she’d plan to make this a “Thirty-ONEderland” - lol. She’s a trip like that and would have totally done A Thirty-ONEderland if her plans to host a “Thirty minus the One” party didn't suit her better.

Anyway, we began looking for venues for the big day.  Although Olivia Madison loved the bounce house parties we attended, for the cost I wanted a place that catered to her age.  During our venue conversation, Tabby opened my eyes to a new concept (at least new to me) when she mentioned soft playrooms.  I scoured the internet for one in my area and really got annoyed when there were none.  I continued to look until I found the next best thing - one in a nearby area that suited our needs. You better believe this determined momma found the place to host what became...Olivia’s Winter ONEderland.

Soft Playroom


Olivia and Zion Playing in the Soft Playroom

I couldn’t believe recreational centers even had spaces like this for infants and toddlers.  This playroom was awesome and everything I wanted for her first party. Now of course, with every great play area there’s a shortfall somewhere in the venue and, this one had many - lol.
1. Capacity.  The playroom only allowed for 15 tiny tots and 25 adults. On top of that, space was also limited to 25 total people in the reception area (the area where food, drinks, and cake would be served). With a list that could easily top 60 people... can you say anxiety?

2. Age. The playroom was lovely and did exactly what I wanted and catered to ages 5 and below and that’s ALL a good thing, right? Not when you have friends with kids in both age brackets (under and over 5).

3. Spacing. The reception area spaces were very limited I seriously only had two options. One was an enclosed room that would never work, the other was the preschool pod.  The pod was the main area outside the rec center's preschool classrooms. The preschool pod was bigger than the enclosed room so I knew I could make it work... even though it had the kids' art work displayed throughout.

4. Walls. How can I put this eloquently? The nice "art" *side eye* "work" the children made just didn’t match my fabulous theme so I needed to cover it - lol. This venue, however, doesn’t allow you to decorate and hang things on the walls... they can’t be serious!


Other than these many few details it was EVERYTHING so I went ahead and booked it. Spent the car ride home talking to Tabby and her beautiful daughter, Zion, about how fabulous it was and our plans to circumvent the system and turn this into a fabulous Winter ONEDerland affair - lol.

Whew!  That’s more probably more than you ever wanted to know about the venue for a first birthday party but... I felt it was necessary to share the backstory to set the tone for Olivia’s Winter ONEderland party.  

Stay tuned for more trips down Memory Lane as it pertains to Olivia’s first birthday; we've got a LOT to talk about!